
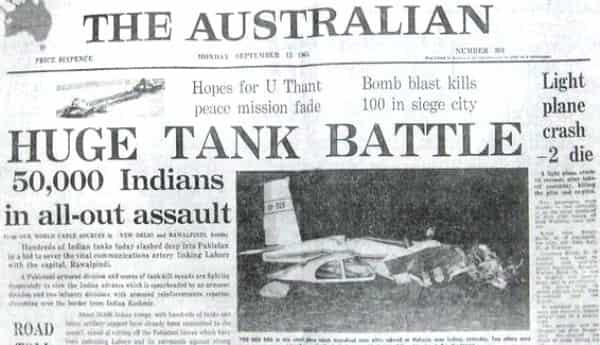
The battle of Chawinda marked the largest clash of armour since the great tank battles of World War 2. Pakistan’s actions at Chawinda were akin to the defensive battles fought by German Wehrmacht and SS-Panzer formations as they sought to counter Soviet armour-infantry breakthroughs in Eastern Ukraine by numerically superior forces in early 1943.
With roughly a hundred and thirty Pakistani and two hundred and thirty Indian tanks involved, Chawinda easily factors in as one of the largest conventional tank battles fought to date post World War 2.
Sialkot Sector – Opposing Formations and Plans
Opposing Formations:
Indian 1st Corps, the striking arm of the Sialkot offensive consisted of the following forces:
- 1st Armoured Division (Black Elephant)
- 6th Mountain Division
- 14th and 26th Infantry Divisions
- I Corps Artillery Brigade supported by 24 and 71 Medium Regiments.
Pakistani forces in the Sialkot sector primarily consisted of:
- 15th Infantry Division, responsible for the defense of Sialkot proper, led by Brig. Sardar Muhammad Ismail and was located in Sialkot with its brigades spread across the front.
- 6th Armoured Division led by Maj. Gen. Abrar Husain, was initially located in the vicinity of Gujranwala, as Pakistani 1st Corps reserve force. The 6th Armoured Div. was a recently formed formation, still in the throes of reorganization and not yet up to division level strength when the war began.
Read more: The graveyard of Indian tanks: the battles in the Sialkot sector in the 1965 war
Indian Plans
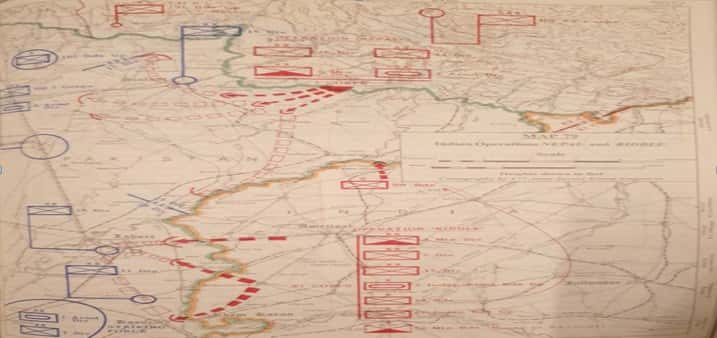
The Indian offensive against Lahore on 6th September was simultaneously followed by their main thrust along the Sialkot front on the night of the 7/8th of September. Codenamed Operation NEPAL, the Indian attack in the Sialkot sector had multiple objectives:
- Pre-empting further Pakistani offensives directed towards Jammu in the aftermath of Operation Grand Slam.
- Cutting of the Grand Trunk Road and seizing key Pakistani territory.
- Preventing the reinforcement of the Lahore front by tying down Pakistani reserves.
Pakistani Plans
On the Pakistani side, defense of the areas north/northeast of Chawinda fell to the 24th Brigade of the 15th Division, while the rest of the 15th Division was committed to the defense of Sialkot proper.
6th Armoured Division’s original plan for the battle was based on holding focal pivots in the area with minimal strength while reserving strong forces for a counter-offensive strike.
The WW2-era M36B2 and Shermans were both obsolete vehicles with out-dated designs and weak guns hardly capable of piercing the armour of modern-day tanks
Both sides lacked intelligence on enemy intentions and strengths. This would be aptly demonstrated during the battles to follow.
Tanks in battle of Chawinda
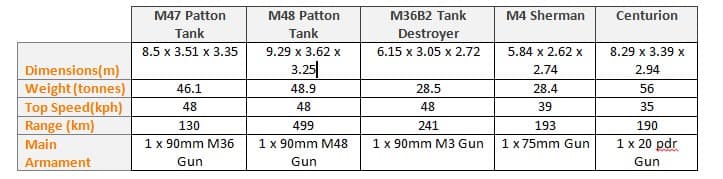
The battles in the Chawinda Sialkot area witnessed motley of tanks in action on both sides. Pakistani armour consisted of M47/M48 Pattons, M4 Shermans and M36B2 Tank Destroyers.
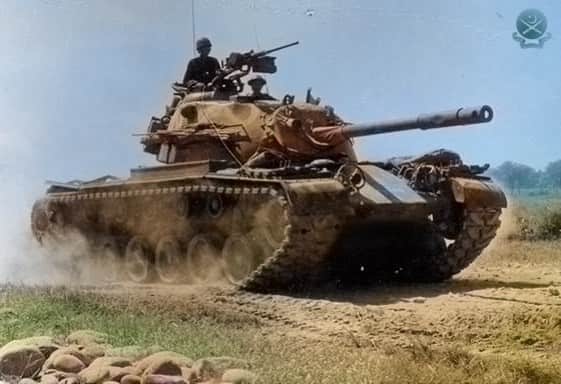
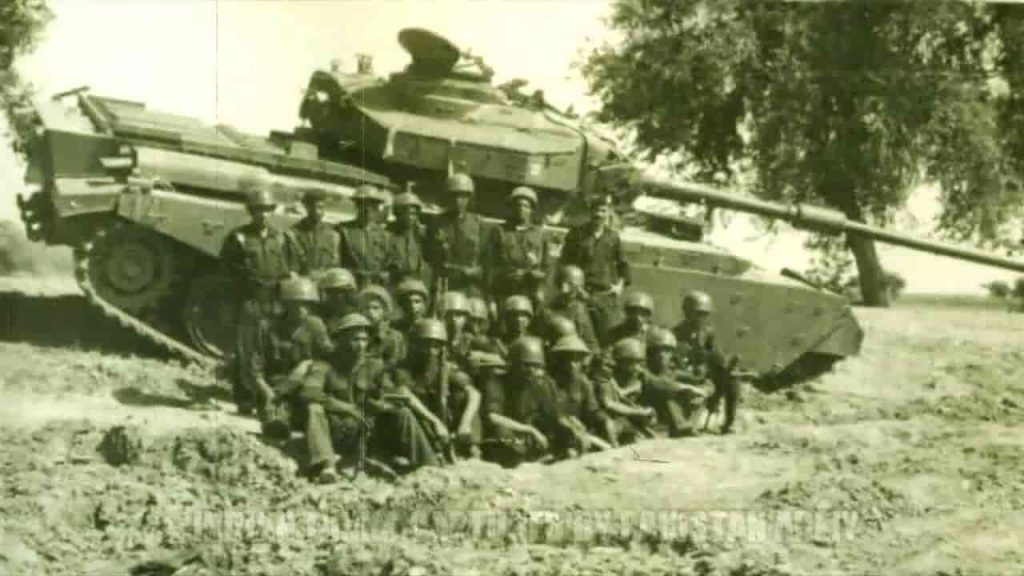
The Indians were primarily equipped with Sherman and Centurion tanks – the latter was a heavier, and better-armoured tank with a more powerful 20 pounder gun. The Patton was lighter and faster, equipped with the less powerful 90 mm gun.
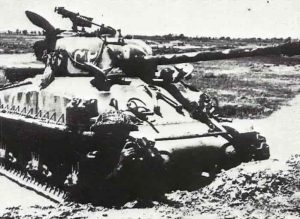
However, the circumstances of Chawinda left little room for speed and manoeuvring by Pakistani tanks, which were on the defensive against a numerically superior opponent for the most part. The WW2-era M36B2 and Shermans were both obsolete vehicles with out-dated designs and weak guns hardly capable of piercing the armour of modern-day tanks.

Sequence of Events Leading up to the Battle of Chawinda
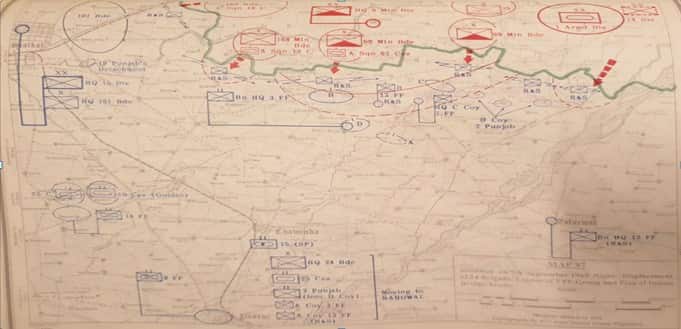
On the night of 7/8th September, the Indian 6th and 14th Divisions advanced across the working boundary (WB) west of Sialkot, intending to establish a bridgehead in Pakistani territory. This bridgehead would then serve as a base for the main advance south by the 1st Armoured Division.
The initial Indian advances at Charwa and Maharajke along the WB were challenged by a numerically inferior company-sized Pakistani forces which held their ground before running out of ammunition and withdrawing south towards Chawinda.
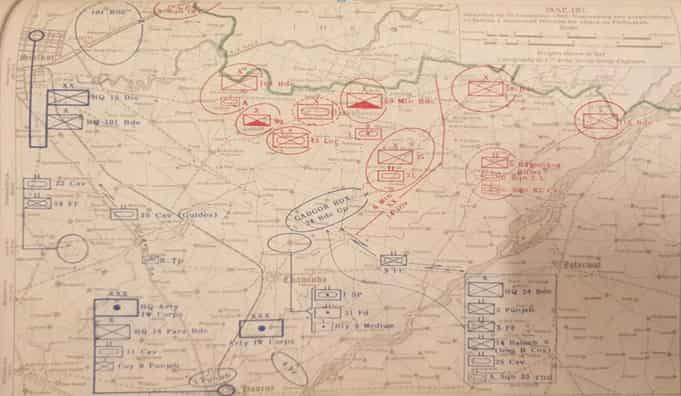
Having successfully established a base inside Pakistani territory, the Indians prepared to unleash the 1st Armoured Division on the 8th of September. Indian armour advanced southwest until they reached the first Pakistani units deployed around Phillaurah village.
Three Indian armoured regiments clashed with the Pakistani 25th Cavalry regiment (later dubbed Men of Steel) led by their CO, Lt. Colonel Nisar. The Indians suffered casualties at the hands of the Pakistanis, eventually withdrawing. Having blunted the attack of three leading Indian armoured regiments, 25th Cavalry recaptured further ground north of Chawinda, reaching Gadgor village.
Read more: How Pakistan planned and prepared for the 1965 war against a stronger enemy?
At this point, Pakistani forces in the area were still unaware of the sheer magnitude of the developing Indian offensive, not realizing they were up against the main Indian armoured Division itself. Subsequently, the night of 8th/9th September saw 24th Brigade launch further localized probes deep into Indian positions northeast of Chawinda to determine enemy strength and dispositions.
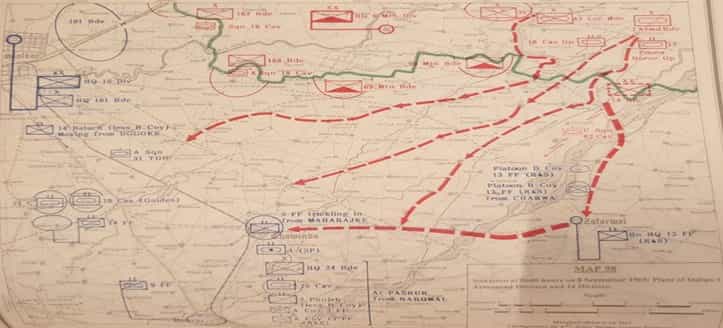
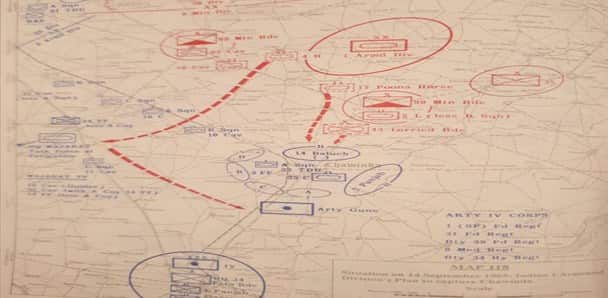
Maj. Gen. Abrar received orders, On the 8th of September, to move the 6th Armoured Division to the Wazirabad-Pasrur-Narowal area to deal with the enemy offensive. Meanwhile, the discovery of Operation Nepal documents on the 9th of September, at last, convinced GHQ of the scale of the Indian attack. Subsequently, the 6th Armoured Division was placed in a defensive role with the objective of defeating enemy moves east of Sialkot up to Degh Nadi. 24th Brigade was placed under the 6th Division for this purpose.
At this critical juncture, the 24th Brigade was redeployed for the defense of Pasrur, south of Chawinda. This left the focal Pakistani defensive positions around Gadgor-Phillaurah area, north of Chawinda with a weak force comprising of a single infantry battalion (9 FF) and an armoured regiment (11 Cavalry). On the Indian side, Commander of the Indian 1st Corps issue orders for the definitive capture of Phillaurah and Chawinda by the Black Elephant Division on the 9th of September.
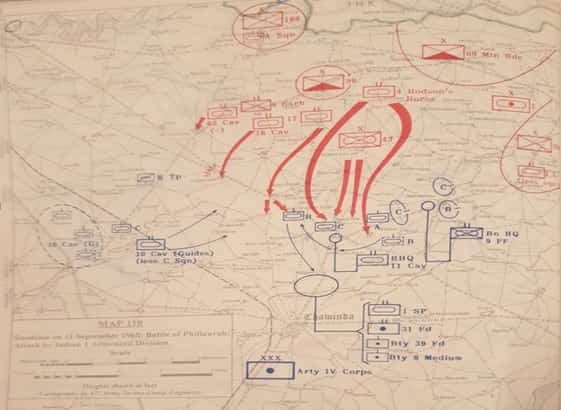
Thus began the second phase of the Indian offensive, with the regrouping of additional units under the Indian 1st Armoured Division to add greater weight to its strength. 10th September marked the commencement Indian offensive south-southwest towards Pakistani defensive positions around Gadgor- Phillaurah, roughly 4km north of Chawinda.
Indian forces enjoyed overwhelming numerical superiority with over three armoured regiments and a single motorized infantry brigade being involved in the attack. This force was augmented by heavy artillery.
The heavily outnumbered Pakistani units struggled to contain the Indian offensive, taking a significant toll on enemy armour and infantry units. The invaluable support rendered by a Pakistani field artillery regiment initially kept the Indians at bay. Just as the Indian onslaught seemed to be waning, misfortune struck the Pakistanis.
An Indian artillery shell struck the area where the commanding officers of Pakistani tank and artillery regiments were holding a meeting. This resulted in a temporary breakdown of communications between the field formations around Gadgor and the Divisional HQ. Coupled with the losses suffered by the lone Pakistani armoured regiment in the area, it led to a withdrawal of forces in the Gadgor box south to Chawinda.
Read more: Pakistan launches first formal Maritime doctrine
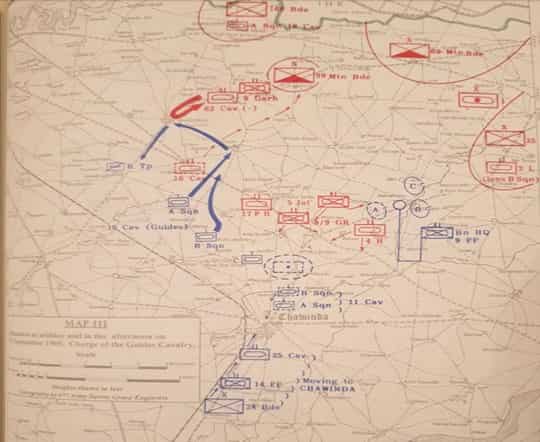
A counter relief operation launched by the Guides Cavalry regiment of the 6th Division on the 11th of September, failed to achieve its ultimate goal of relieving pressure on 11th Cavalry and 9 FF in spite of the destruction of over 20 Indian tanks during the action for the loss of just six tanks.
Nevertheless, it helped stabilize the situation by preventing further Indian penetration south towards Chawinda for the time being. The withdrawal of all Pakistani formations from Phillaurah-Gadgor south to Chawinda was affected on the 11th of September. The same day Indian units entered and took control of the area.
Despite inflicting losses on the enemy, the Pakistanis were forced to abandon Gadgor-Phillaurah defensive positions. They now prepared to defend the Chawinda crossroads to prevent further Indian advances between Sialkot city and Degh Nadi. Between 11th and 14th September, there was a comparative lull in fighting on the Chawinda front as the battle of Zafarwal commenced east of Chawinda. The battle of Zafarwal ended favourably for the Pakistanis, forcing the Indians to focus their attention back to Chawinda.

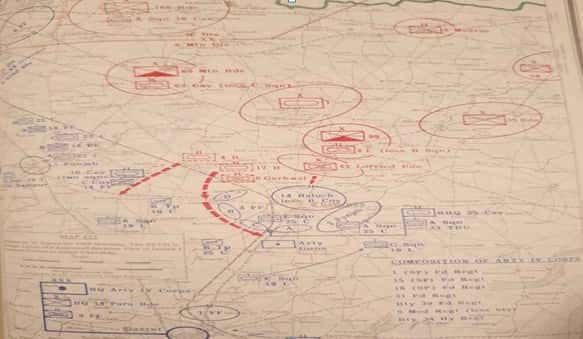
Battle of Chawinda Order of Battle


With the capture of Phillaurah, the next phase of Indian operations naturally focused on the capture of Chawinda, which lay directly on the route to Pasrur. Any further Indian advance in the region was contingent on the capture of Chawinda.
The deployment of Pakistani forces in the Chawinda area was as follows:
- 24th Brigade in the main Chawinda area.
- Wajahat Task Force (Guides cavalry and 22 Cavalry armoured regiments plus 14 FF infantry battalion) to the west of Chawinda astride the critical Chawinda- Badiana axis.
- IV Corps Artillery deployed behind Chawinda in a support role.
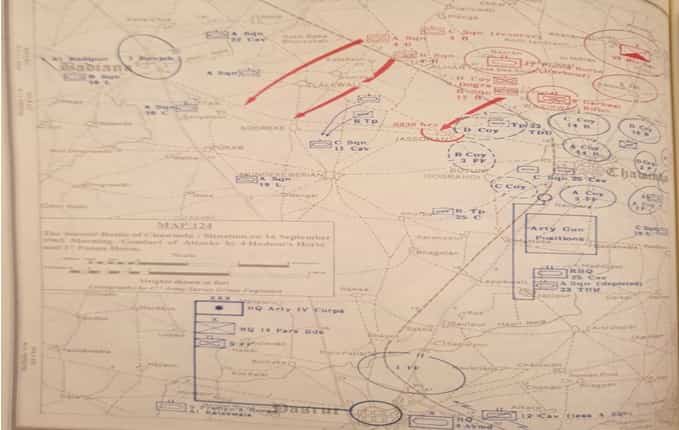
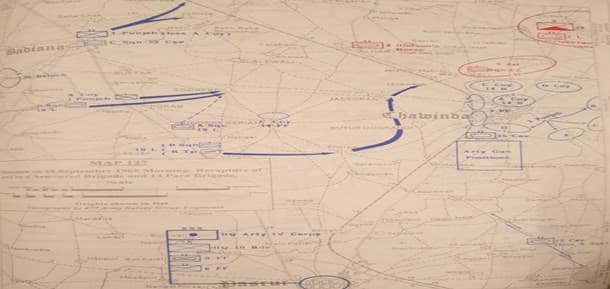
The Battle Commences (14th September)
The dawn of 14th September saw a strong Indian probe from the north-west of Chawinda involving armour and infantry. The intended goal was to break through Pakistani lines and outflank Chawinda from the west. The attack was successfully foiled by units of the Guides and 25th Cavalry although the battle raged till mid-day.
In the interim, the main Indian attack came from the North towards Pakistani positions at Chawinda proper. This attack was met by formations of the 24th Brigade, supported by units of the independent task force.
These attacks were supplemented by further Indian attacks west of Chawinda as they attempted to cut off the Chawinda-Badiana- Sialkot axis
The Indians attempted to break out towards the west of Chawinda with the goal to sever the Badiana-Sialkot road, thereby splitting the front between Chawinda and Sialkot in two. By 1800 hours, the first Indian attacks on Chawinda had been blunted with the support of Pakistani artillery and PAF attacks.

Baptism of Fire (15th September)
The morning of the 15th of September witnessed a renewed Indian push towards Chawinda from the north. Battalions of the 24th brigade supported by artillery held their ground against multiple combined infantry-armour attacks by the enemy. Indian infantry reinforcements were spotted from afar by Pakistani artillery, as they dismounted their vehicles to deploy in the area north of Chawinda.
Devastating rounds of air bust fired by Pakistani artillery resulted in the near destruction of these units. Afterwards, fresh infantry-armour attacks were launched against the defenders of Chawinda proper from the north, but all efforts had been repulsed by last light on the 15th of September.
Read more: History of PAF’s role in counterinsurgency operations
These attacks were supplemented by further Indian attacks west of Chawinda as they attempted to cut off the Chawinda-Badiana- Sialkot axis. Here, the lone Guides cavalry regiment, backed by 14 FF battalion, engaged the enemy, successfully containing an entire Indian motorized infantry brigade supported by two armoured regiments. Pakistani defenses had once again frustrated Indian plans.

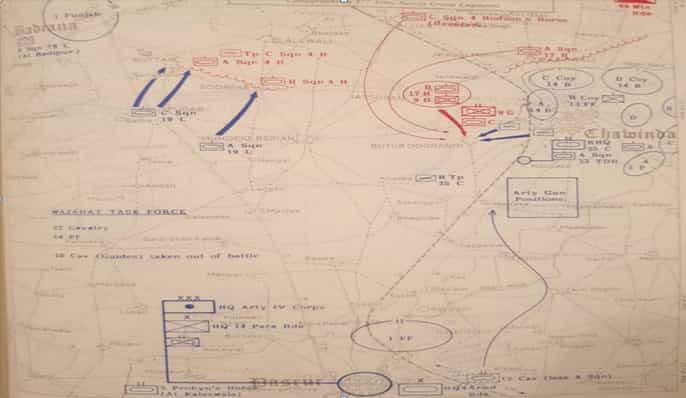
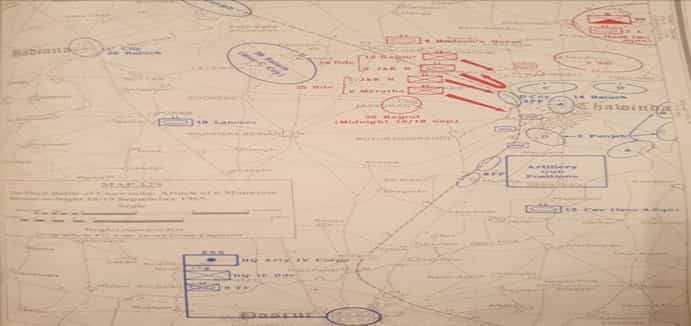
With Fire and Steel (16th September)
The 16th of September will be remembered for the fiercest tank battles of the war, with 6th Armoured Division being forced to commit all its armoured units in the Chawinda area. The Indians planned to attack along the Chawinda-Badiana axis to the west of Chawinda, with a single armoured regiment (4 Horse) in an area held by the now understrength Guides cavalry.
Simultaneously, another armoured regiment (17 Horse), backed by a strong infantry battalion (8 Garhwal), had the task of striking the western edge of the Chawinda town defenses at the village of Jassoran, held by the Pakistani 3 FF battalion of the 24th Brigade which was supported by 25 Cavalry.
In the second phase, this same force was to capture Butur Dograndi on the Southern tip of Chawinda town, thereby cutting off Chawinda from South and West. Concurrently, 14 Baloch positions on the Northern edge of Chawinda proper were to be attacked and fixed by a motorized Indian infantry brigade (43 Lorried Brigade).
The multi-pronged Indian assault began at dawn on 16th September, heralded by massive artillery fire directed mainly at Chawinda town itself. The first wave was launched at 0730 hours, followed by subsequent assaults at 1230 and 1630 hours, well into darkness.
The Pakistanis discovered Butur Dograndi littered with destroyed enemy tanks, damaged equipment and dead bodies, the work of Pakistani artillery from the previous day
Even 6th Armoured Division’s reserve force, the 19th Lancers armoured regiment had to be committed to deal with the massive Indian attack. The area to the west of Chawinda became the scene of intense clashes.
Fierce tank battles erupted between Indian formations (4 Horse and 17 Horse) and the Pakistani Guides Cavalry backed by a squadron belonging to 11 Cavalry. The embattled Pakistani armoured regiments were eventually forced to withdraw under the sheer weight of the Indian attack. The latter succeeded in establishing a foothold along the Chawinda Badiana axis.
Events took a turn for the worst as the second Indian force successfully captured Butur Dograndi after a hard fight, forcing the withdrawal of the Pakistani 3 FF battalion. The western parameter of Chawinda town was left entirely exposed.
An energetic counter attack by 6th Armoured Division reserve, the 19th Lancers, led nowhere as the force failed to dislodge the enemy from her positions west of Chawinda. With the fall of Butur Dograndi and the capture of areas along the Chawinda Pasrur axis, the Indians had successfully cut off Chawinda from North and West as initially envisaged.
The Indian force at Butur Dograndi now attempted to entirely cut off the Chawinda- Pasrur track south of Chawinda. In this hour of crisis, the gunners of the Pakistani 1st SP artillery unit rose to the looming threat by engaging the advancing Indians and inflicting significant casualties.
In this hair and nail fight, they were joined by the veterans of the 25th Cavalry (Men of Steel). The Indians suffered considerable losses in men and machines as well as the death of their commander Lt. Colonel Tarapore, before withdrawing to Butur Dograndi.
Read more: Assessment of India’s Balakot raid, aftermath & future implications
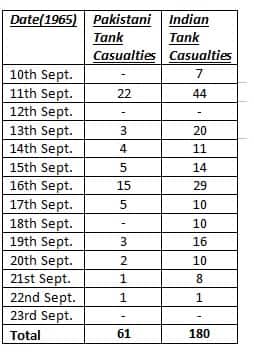
16th September saw the fiercest fighting on the Chawinda front leading to the loss of 15 Pakistani and 29 Indian tanks. The end of the day marked the arrival of much-needed reinforcements for the Pakistanis in the form of units of 1st Armoured Division (Mailed Fist) from Khem Karan.
Pakistan’s Riposte (17th and 18th September)
It had become imperative for the Pakistanis to dislodge the Indian units on the perimeter of Chawinda at Jassoran and Butur Dograndi since these formations threatened to cut off Chawinda in its entirety. The morning of 17th September witnessed a Pakistani counter-offensive aimed at the recapture of Butur Dograndi.
A combined force consisting of a single infantry company of 3 FF and a squadron of the 25 cavalry, backed by artillery attacked Butur Dograndi. Indian 8 Garhwal battalion, then holding Butur Dograndi, fought back tenaciously and attempted to hold off the Pakistani force.
The next Indian attack came in the morning with the entire Indian 35th brigade falling upon the western parameter of Chawinda. The Pakistanis saw a large force approaching them with chants of Jai Hind
At this point, virtually the entire Pakistani artillery in Chawinda sector opened up on Indian positions at Butur Dograndi. 8 Garhwal effectively ceased to exist as a force, with the remnants abandoning Butur Dograndi and withdrawing north.
24th Brigade reoccupied Butur Dograndi the next day. The Pakistanis discovered Butur Dograndi littered with destroyed enemy tanks, damaged equipment and dead bodies, the work of Pakistani artillery from the previous day. Added to this was the withdrawal of now under-strength Indian formations from lodgement areas along the Chawinda-Badiana axis to the west of Chawinda.
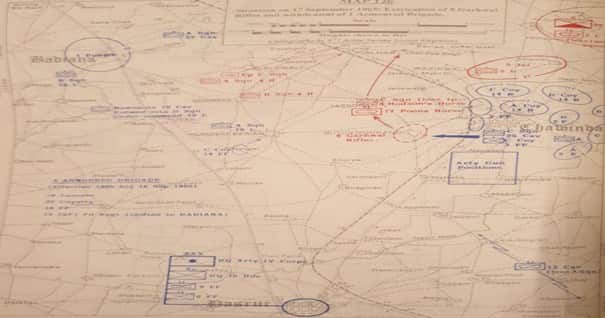
These actions were exploited by the Pakistanis through a limited offensive of their own on the 18th of September which saw the capture of virtually the entire area along the Chawinda- Badiana axis west of Chawinda, restoring the status to pre 16th September positions.
Last Attack in the Dark (Night of 18th/19th September)
The night of 18th September witnessed a final Indian attempt to make an impression on the Chawinda defenses. With the Indian 1st Armoured Division effectively out of action as a consequence of exhaustion and attrition from the previous days fighting, the task of assaulting Chawinda now fell to the 6th Mountain division. The Division launched their attack with two infantry brigades and a single infantry battalion, backed by 4 Horse armoured regiment.
The brunt of the attack fell on the northwestern and western approaches of Chawinda itself. These were the same approaches which had been recaptured by the Pakistanis a day before. In a repeat of its past few days’ performances, men of the 24th Brigade put up an effective defense against this force.
The initial withdrawal of some Pakistani units from the western approaches caused concern. Nevertheless, the situation was stabilized by the presence of the 25 Cavalry (Men of Steel), who thwarted all enemy attempts at penetrating the western defenses.
Read more: Rafale and Al-Khalid-1: Increasing war-fighting capacity and regional security puzzle
The next Indian attack came in the morning with the entire Indian 35th brigade falling upon the western parameter of Chawinda. The Pakistanis saw a large force approaching them with chants of Jai Hind. At this point, 3 FF and 25 Cavalry, backed by IV corps artillery, opened up with all their weapons. What ensued was a massacre.
As the morning sun rose, the battlefield was littered with Indian corpses. As per the accounts of 6th Division, over 500 Indian bodies were discovered in front of Pakistani positions. Over 100 prisoners were taken by the Pakistanis in the aftermath of this bloodbath. The attacking Indian brigade effectively ceased to exist as a force for the rest of the battle.
The End (19th September Onwards)
The 19th of September witnessed a weak Indian armoured attack to the west of Chawinda, along the Chawinda Badiana axis. This attack was quickly repulsed, and the Pakistanis countered by pushing Indian armour back even further than their original starting positions.
Indian infantry’s attempts to recapture the villages in this area were foiled. The day ended with the Indians pulling back and leaving behind 100 dead bodies, eight running tanks and some recoilless rifles.
The rest of the war witnessed limited skirmishes between both sides. An Indian brigade-sized attack on the night of 20/21 September in the direction of Badiana was countered and repulsed by the single Pakistani battalion (20th Baloch) in the area.
Read more: What led to 1965 war? – Part 1
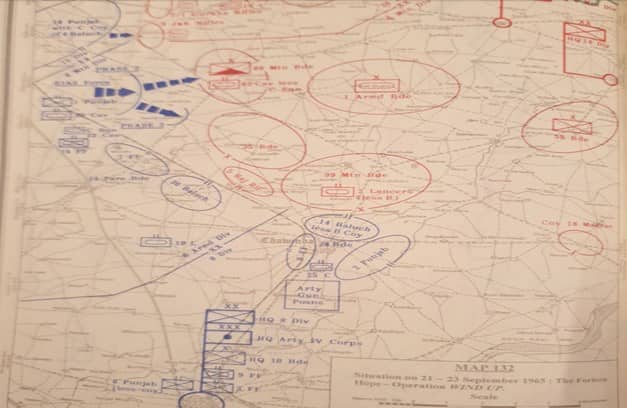
Subsequently, a large scale Pakistani offensive codenamed Operation Wind Up was planned for the 21st of September. This operation was cancelled at the last moment due to preparations for a ceasefire.
Total Indian casualties for the battle were 180 tanks destroyed. The Pakistanis emerged victorious with the loss of 61 tanks, 200 battle casualties and 476 wounded. The battle of Chawinda was over.
Retrospect
The battle of Chawinda marked the high point of the 1965 war. With a deadlock on the Lahore front and small-scale Pakistani victories in the southern theatre, it became increasingly imperative for the Indians to break through and capture strategically important territory in Punjab.
The strength of Sialkot’s defenses left the area to its west as the only possible outlet for furthering Indian ambitions. A dearth of intelligence on the Indian side, compounded by lack of boldness on the part of Indian Divisional and Brigade commanders contributed to the Indian failure.
Read more: What happened on the Kasur front in the 1965 war?
The obsession with Chawinda affected the conduct of the Indian 1st Corps operations as a whole. As repeated Indian assaults failed, the focus of the Indian attacks changed from intelligent employment of units flanking Chawinda, to brute force attacks on the defenses of Chawinda itself. The Indians repeatedly smashed themselves against a wall, failed to find a way around it and subsequently suffered in the process.
On the Pakistani side, the opening stages of the battle witnessed anxious moments. While leadership at the regimental and battalion level was praiseworthy, the initial debacle at Phillaurah-Gadgor could have been mitigated by strengthening the position with additional units.
The intelligence failure in identifying the Indian 1st armoured division or the scale of 1st Corps offensive in time drastically affected Pakistani operations and plans at the onset. The closing stages could have been more fruitful had Operation Windup taken place as the ability of Indian infantry and armoured formations to resist a concerted onslaught after days of severe attrition and exhaustion was questionable.
Major General Abrar’s commendable leadership and sound perception of the situation played a key role in turning around the situation at critical junctures of the battle. GOC 6th Armoured Division displayed flexibility in deviating from the original plan and moving to a largely defensive role at the start
The story of Chawinda would be incomplete without mentioning the sacrifices rendered by the soldiers and officers of Pakistan’s infantry and armoured corps who, faced with a vastly superior foe, stood resolute in their hour of crisis. The bold charge of the 25th cavalry and the steel wall of the Guides cavalry regiment will forever be enshrined in the chronicles of military history.
Read more: NISHAN-E-HAIDER – Gallantry award of its own kind
The defense of Chawinda box by 24th Brigade against countless armoured assaults and the zero-range firing of Pakistani gunners during the battle of Butur Dograndi bear testament to the steadfastness of Pakistani soldiers.
And lastly, a word of tremendous appreciation must be put in for the Pakistan Air Force, which provided vital support to ground formations at pivotal stages of the battle by wreaking havoc among Indian ground formations while simultaneously keeping the Indian Air force at bay.
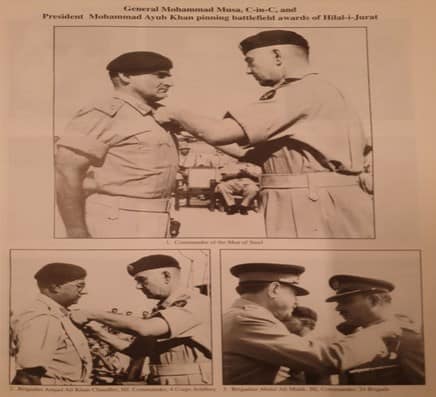
– GOC 6th Armoured Division Maj. General Abrar Husain being awarded by CinC General Musa Khan
– GOC 24th Brigade, Brig. Abdul Ali Malik being awarded by President of Pakistan, Ayub Khan.
– GOC IV Corps Artillery, Brig. Amjad Ali Chaudhri being awarded by CinC General Musa Khan
Ammad Usman, a passionate researcher into military history has studied at McGill University and the University of Toronto; he can be contacted at his email address: ammad.usman@mail.mcgill.ca. The views expressed in this article are the author’s own and do not necessarily reflect the editorial policy of Global Village Space.